
Submission Instructions
Please follow these instructions to create a submission, after you have developed your model/algorithm. To understand the challenge tasks, please read the Tasks guide first.
To be able to create a submission, you need to fulfill the following requirements:
- Be registered on grand-challenge.org.
- Have joined the DoseRAD2026 challenge via here.
Once you have joined the challenge you can create up to 10 submissions during the preliminary testing phase and up to 2 submissions during the final testing phase, per task variant. For technical challenges please consult the respective grand-challenge.org documentation.
Example dummy container for input/output submissions
The challenge input/output structure is optimized for efficiency on the Grand Challenge platform and is non trivial. An example container designed to read the inputs, produce noise-filled dose maps of the correct shape and write them in the proper output format is available at this link. Please familiarize yourselves with the instructions accompanying this example.
Create an algorithm on Grand Challenge
If you already created an algorithm for a prior phase or a different model, you do not need to create a new algorithm. Instead the linked page will guide you to manage the container images linked to your previous algorithm. Here, you can link a new repository or upload a new container image. If you already linked a github repository to your algorithm, creating a new tag, i.e., release will trigger the new build process and be shown on the manage containers page.
To create a new algorithm, go to the submit page of the phase you want to enter. There are eight phases to choose from (four task variants, each with a preliminary and a final testing phase), so make sure you pick the one matching your variant and phase. For example, the photon preliminary testing phase (see screenshot below):
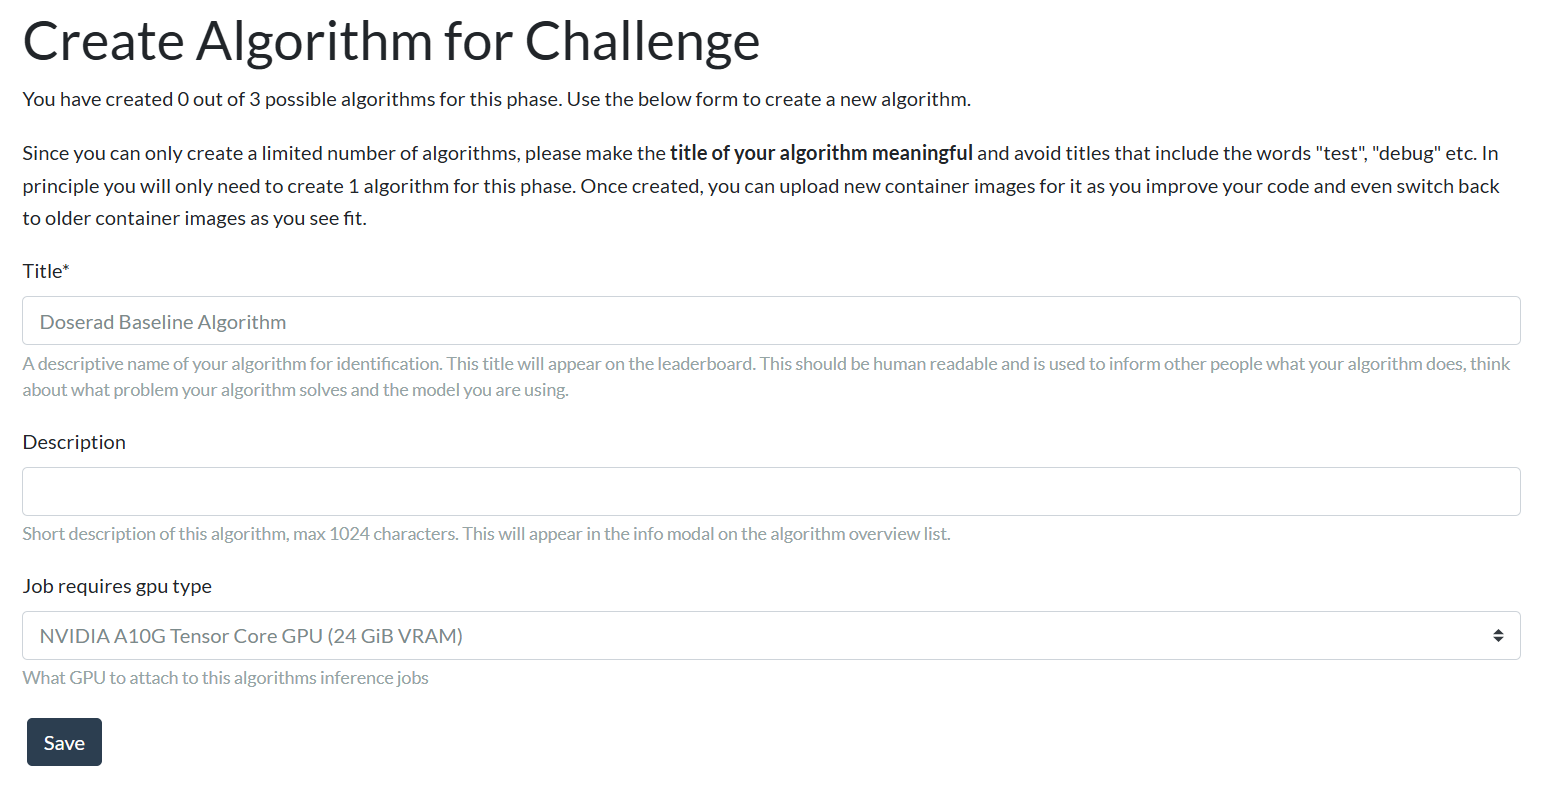
For the title we recommend choosing a meaningful name, however you will be able to provide a final official name for your algorithm at a later stage. For the GPU, please select "NVIDIA A10G Tensor Core GPU (24GiB VRAM)".
Next, you can either upload a docker image or link a github repository to the algorithm (see screenshot below):
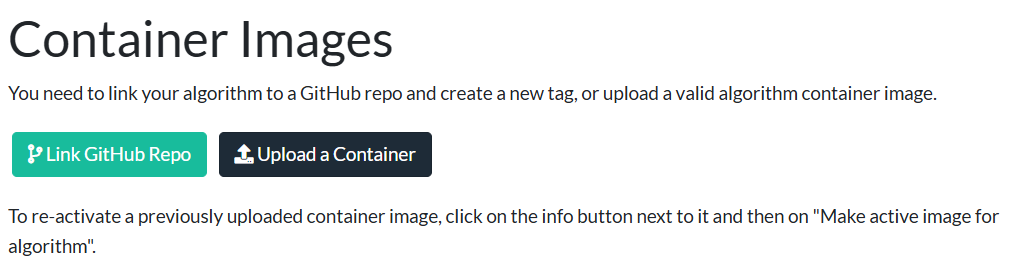
We strongly recommend linking a github repository. Once this step is done, grand-challenge will start building a docker image from the repository (or the docker container file).
You can see the progress on the manage container page. Please wait until the container is marked Active, which might take a while. If the build process failed, you can view the logs by clicking the [i] button.
Note that the upload/building of algorithm containers does not count towards your submission limit. However, if you have trouble with packaging your algorithm, please contact the organizers for help.
Create a submission
Once your algorithm is marked Active, go to the submission page and select the phase you want to submit to on the top.
Before submitting to the final testing phase, make sure your algorithm works locally on your device and by submitting to the preliminary test phase.
The only required field is the algorithm field, where you select the algorithm you created. Optionally, you can leave a comment to your submission.
Check the results
After you click the "Save"-Button on the submission page, a new evaluation is created on the grand challenge platform.
For the preliminary testing phase, logs are enabled and you can see the output, as well as your scores and if there have been any errors. If your code produces errors in the final testing phase, we recommend to test it locally. You can also contact the organizers.
For the final testing phase, logs are disabled, to prevent leakage of the testing dataset through logs. You will thus not receive any feedback other than the scores and whether or not there have been any errors. If your code produces errors in the final testing phase we recommend to submit it to the preliminary test phase again. You can also contact the organizers for any help regarding the grand-challenge platform.
Once the evaluation is complete and scored, you can submit the results to the leaderboard.
Algorithm interface specification
Four task variants: proton / photon × CT / MRI. Submit a separate algorithm per variant you enter. This guide describes the input your container receives, the output it must produce and the container/API contract.
1. Input contract
Your algorithm container is invoked once per run. A run's input is mounted read-only under input and contains:
images/radiation-dose-calculation-source-<ct|mri>-image-1/   <one .mha>
images/radiation-dose-calculation-source-<ct|mri>-image-2/   <one .mha>
...
images/radiation-dose-calculation-source-<ct|mri>-image-10/  <one .mha>
stacked-<proton|photon>-beam-level-metadata.json
Image files
- There are always exactly 10 image slots, numbered 1–10, regardless of how many are actually used in a given run.
<ct|mri>is fixed per task variant (literallyctormri). - Each slot contains exactly one
.mha. Slots not used by this run contain a trivial 1×1×1 placeholder (single voxel, value 0) — ignore any slot not referenced by the metadata below. - Images are de-identified. Do not attempt to infer or rely on patient identity. Access them by finding the only .mha present inside each directory.
Metadata file
A single JSON array. Each element describes one input image and the dose units (beams) required from it:
{
  "image_file_idx": 0,           // 0-indexed; maps to slot image_file_idx + 1
  "anatomical_region": "thoracic", // "thoracic" or "abdominal"
  "beams": [ ... ]
  ["iso_center": [...]] // for proton files, iso_center is given at the image level, following the training set schema
}
image_file_idx tells you which of the 10 mounted images this entry belongs to (slot number = image_file_idx + 1). A run's metadata array typically has fewer than 10 entries — only the referenced slots hold real images.
The anatomical_region field has been added at the image level of the json, since it can no longer be inferred from image names.
Proton — beams[].rays[].beamlets[]:
{
  "gantry_angle": 210.0,
  "rays": [
    {
      "ray_source": [-495.0, 0.0, 0.0],
      "ray_target": [0.0, 0.0, 0.0],
      "beamlets": [
        {
          "beamlet_uuid": "5a4a5aac-...",
          "energy": 100.0,
          "output_info": {
            "output_file_idx": 0,
            "idx_in_output": 0,
            "minimum_cutoff": 0.02
          }
        }
      ]
    }
  ]
}
Photon — beams[].control_points[]:
{
  "SAD": 1000,
  "iso_center": [0.0, 0.0, 0.0],
  "num_mlc_leaf_pairs": 80,
  "control_points": [
    {
      "cp_uuid": "5a4a5aac-...",
      "gantry_angle": -180.0,
      "mlc_left_int_mm": [0, 0, ...],
      "mlc_right_int_mm": [0, 0, ...],
      "output_info": {
        "output_file_idx": 0,
        "idx_in_output": 0,
        "minimum_cutoff": 0.02
      }
    }
  ]
}
beamlet_uuid/cp_uuid values are opaque identifiers — you never need to write them anywhere yourself, only read output_info to know where each computed dose belongs (see below).
A single run may contain beams belonging to one or several different patients. The input .json file contains a list of objects, each being similar to training set JSONs, with their indices removed.
Additionally, they carry -per dosemap- an output_info entry, which is the only field that determine where your output goes (see below).
2. Output contract
Write results to your output mount, structured as:
stacked-radiation-dose-map-1/   <one .mha>
stacked-radiation-dose-map-2/   <one .mha>
...
stacked-radiation-dose-map-10/  <one .mha>
- Always write all 10 slots, even ones this run doesn't use, for those write a trivial placeholder (e.g. 1×1×1×1, value 0) to unused slots, same convention as the input side.
- Each slot directory must contain exactly one
.mhafile. - The file must not contain any non-zero values less than
minimum_cutoff.
Placing a dose/dose-stack
Every beamlet/control point's output_info gives:
| Field | Meaning |
|---|---|
output_file_idx |
which output slot (0-indexed → slot output_file_idx + 1) this beam's dose goes in |
idx_in_output |
this beam's position within that slot's stack (0-indexed) |
minimum_cutoff |
see below |
All beams sharing an output_file_idx go into one file, ordered by idx_in_output (0-indexed, contiguous, no gaps). The filename does not matter, only its location.
- Exactly one beam in that slot → Always a 4D volume
- Stack of 3D dosemaps in
idx_in_outputorder.
Critical pitfall: do not build the multi-frame case by calling
sitk.GetImageFromArray()directly on a stacked 4D numpy array. SimpleITK will silently interpret the extra axis as vector-pixel components, not a spatial/stack dimension — the file will look superficially fine but the wrong data will end up in the wrong place, with no visible error. Build it like this instead:
frames = []
for dose_array in per_beam_doses_in_order:
    frame = sitk.GetImageFromArray(dose_array)
    frame.CopyInformation(input_image)
    frames.append(frame)

stacked = sitk.JoinSeries(frames)   # builds a 4D image
sitk.WriteImage(stacked, output_path)
sitk.JoinSeries requires all frames to share identical origin/spacing/direction (See next requirement).
Dose grid geometry
Every dose you output must be on exactly the same grid as the input image it belongs to (via image_file_idx): same size, spacing, origin, and direction. Do not resample onto a different grid.
Minimum Cutoff
Every beamlet/control point's output_info.minimum_cutoff is the dose value below which your output must not report anything for that beam. Voxels below it should be zero, not small positive noise: dose_array[dose_array<=minimum_cutoff] = 0. Submissions containing values below their own declared cutoff are flagged as a defect and counted by the "Implementation Errors Count" metric. Too many submissions violating the cutoff cause high platform costs and may lead to a team ban.
3. Container / invoke API
Your container must implement Grand Challenge's HTTP invoke interface:
- Container starts, immediately starts loading models into memory, no access to input data yet.
- GET /health → responds 200 once ready to accept requests.
- Input data is made available.
- POST /invoke → process whatever is currently mounted as input, write full output, respond 201 on success.
- The image must carry:
dockerfile
  LABEL org.grand-challenge.api-method="invoke"
without this label the platform will not recognize the invoke interface is active (submission will fail).
Runtime constraints:
- No network access during invoke. Bring any model weights inside the image or via the read-only model mount; do not attempt to download anything at runtime.
- Input mount is read-only; output mount is writable.
- A scratch directory is provided for temporary files; do not write anywhere else in the filesystem.
- Invocation duration is measured by the platform. Not preparation time: Time before you respond
200on/healthis "free", make sure to load your models then.
4. Pre-submission checklist
- All 10 output slots present every run, even unused ones.
- Multi-beam stacks built via
sitk.JoinSeries(or equivalent genuine 4D construction), never a rawGetImageFromArrayon a stacked numpy array. - Each dosemap-stack's dose grid (size/spacing/origin/direction) matches its input image exactly.
- No values below a beam's own
minimum_cutoff. - Beam placement follows
output_file_idx/idx_in_outputfrom the metadata exactly, not assumed order. -
LABEL org.grand-challenge.api-method="invoke"set on the image. -
/healthand/invokeboth implemented - No network access; only the provided mounts are writable.